Files can be added through the Digital Assets module or can be stored on a separate server and linked to the PHY records. Digital objects consist of images, documents, audio and video files. In order to display digital objects, they must have a thumbnail image.
If the digital object was uploaded to Digital Assets, there will always be a thumbnail and master version available. The thumbnail is generated automatically from the uploaded digital object (thumbnails are generated from images and pdfs, but default thumbnails are displayed for other digital objects, e.g. text documents). The master version will be the original digital object and will maintain the format in which it was uploaded. If you load a jpg, the master will be a jpg.
If the image is a large size, it will be resized to fit in an average screen on your OPAC. However, the printed version will maintain the dimensions of the original.
You may wish to watermark your images, or upload lower resolution images to discourage users from saving your images and contravening copyright. This should be done before you upload the digital objects to Archives.
Add files using Digital Assets
In this example, we'll add an item to a collection and store the image in the Digital Assets module.
- Navigate to the collection record and click Add Child Record at the Full Display.
- Enter details of the item.
- In Holdings area - Originals select the Item is in digital form checkbox, and select the Store digital object in Spydus checkbox.
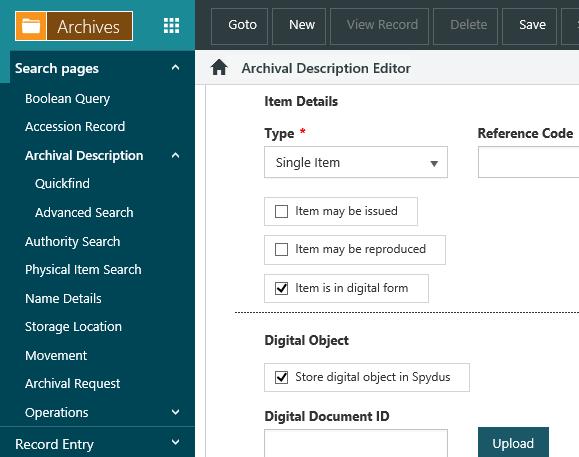
- Click Upload. This opens the Upload Digital Asset dialog.
- Select from the option you want.
- Select Upload Digital Asset to upload a file.
- Select Link to External Asset to create a digital asset using a URL.
- Select Select Digital Asset to search for and select an existing digital asset in Digital Assets.
- Once you've uploaded the digital object, click Save or Save & Close.
Uploading a digital asset
If you're uploading a digital asset:
- Click Select Files, find the file you want and click Open. The file can be a file on the local machine or a shared drive. Once this file is loaded into Digital Assets, a copy is saved in the Digital Assets repository. Therefore, it is not necessary to keep a copy of the file from the original source location.
- Click Upload Selected Files.
- Enter details of the file. You can add the title, add tags or add the file to a particular folder in the Digital Assets repository. Access properties can also be added to the file.
- Click Add to upload the digital object.
- Click Close to return to the entry form. You'll see a document ID has been assigned to the digital object.
Linking to an external asset
If you're linking to an external asset:
- Select Link to external asset.
- Enter a valid URL and click Add.
- Enter details of the file. You can add the title, add tags or add the file to a particular folder in the Digital Assets repository. Access properties can also be added to the file.
- Click Add to link to this external asset.
- Click Close to return to the entry form. You'll see a document ID has been assigned to the digital object.
Selecting a digital asset
Instead of uploading a new file, you can select an existing digital asset from the Digital Assets repository and link to it.
- Select Select digital asset.
- Using the search form, find the asset you want.
- Click Select. You'll see that the button now says "Selected".
- Click Close to return to the entry form. You'll see a document ID has been assigned to the digital object.
Link to digital objects stored elsewhere
It is also possible to link to digital objects stored on a separate server or on your Spydus server. To do this, you will need to know the pathname to where the object is stored.
In Holdings area – Originals select the Item is in digital form checkbox. This will remove the Storage location details.
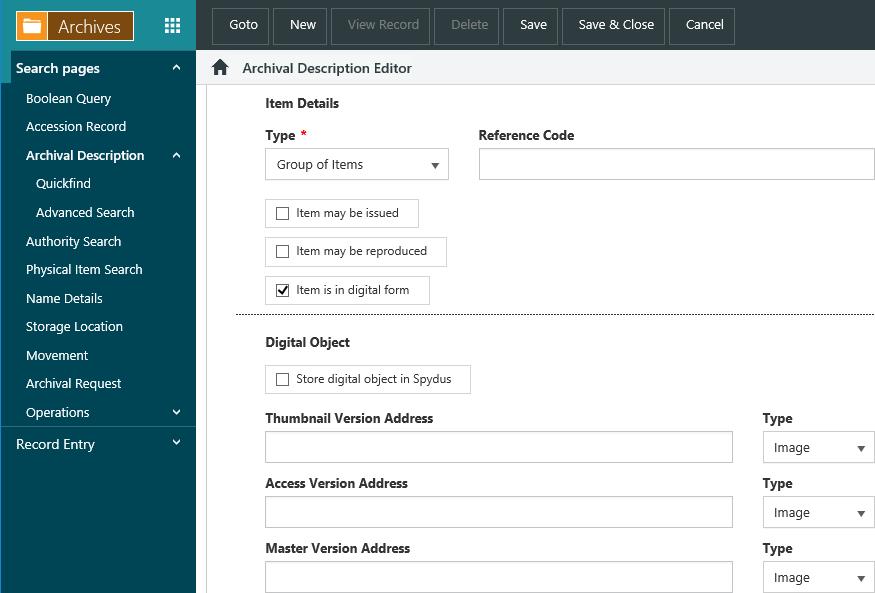
You can add up to three versions of an image – a thumbnail, access version and master version. Typically the access version would be the image with a lower resolution and/or watermark applied, and the master version would be the archival-quality .tiff file if you have one.
The thumbnail and access version will be used by the Archives module for formulating the OPAC display. The master version will not be used – this is for your reference only.
Type the complete pathname to each of the image versions you are using, and indicate the type of file it is by selecting from the dropdown. The pathname should be in the format: