Storage locations are set up in a hierarchy as follows:
- Location.
- Sub-location (as many levels of these as required for organisational purposes).
- Area/Container.
Items are linked to the bottom of the hierarchy to Area/Container records.
Add a new storage location
To add a new storage location:
- From the Module Menu select Archives.
- Select Record Entry and then Storage Location.
- Fill in details of the code and name, and then click Save or Save & Close.
When you create a new storage location, the only type you can select is "Location". This is to create the top level of the hierarchy.
Add a new sub-location, area or container
To add a new sub-location, area or container:
- From the Module Menu select Archives.
- Select Search Pages and then Storage Location.
- Find the location, sub-location or area you want. At the Full Display, click Add Child Record.
- Fill in details of the code and name, and then select the type.
- Under a location you can add a sub-location, an area or a container.
- Under a sub-location you can add a sub-location, an area or a container.
- Under an area you can add a container.
- Click Save or Save & Close.
Edit a location
To edit a location, sub-location, area or container:
- From the Module Menu select Archives.
- Select Search Pages and then Storage Location.
- Find the location, sub-location or area you want. At the Full Display, click Edit Record.
- Make your changes, and click Save or Save & Close.
Delete a location
To delete a location, sub-location, area or container:
- From the Module Menu select Archives.
- Select Search Pages and then Storage Location.
- Find the location, sub-location or area you want. At the Full Display, click Delete Record.
- Click Yes at the confirmation prompt.
Description of fields in a storage location
Parent record
Shows the code and name of the parent record. To link to another parent, click Search, find the record you want, and then click Select Record at the Full Display.
Code
A descriptive code, e.g. RM1 for Room 1. Include the codes for the parents in the code. In the simple example below we’ve got a location RM1. In that location is a sublocation — a Bay — so the code for that Bay is RM1B1. In that Bay are two further sub-locations — two Shelves — so the codes for those Shelves are RM1B1S1 and RM1B1S2. In RM1B1S1 there are two containers — two boxes — so the codes for those Boxes are RM1B1S1BX1 and RM1B1S1BX2.
location RM1
|
|
sub-location RM1B1
|
|
+--------+--------+
| |
| |
sub-locations RM1B1S1 RM1B1S2
|
|
+-----+-----+
| |
| |
containers RM1B1S1BX1 RM1B1S1BX1
Name
The name of the storage unit, e.g. “Room 1”, “Bay 1”, “Shelf 1” or “Box 1”.
Don’t include the names of the parents in the name. In the example above the containers have the names “Box 1” and “Box 2”. They do NOT have the name “Room1 Bay 1 Shelf 1 Box 1” and “Room1 Bay 1 Shelf 1 Box 2”.
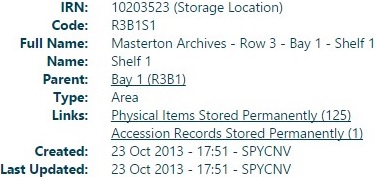
The Full name you see in the Web is automatically constructed, for example:

So — for example — to find this specific “Shelf 1” you can either search for the code R3B1S1 or go down through the hierarchy.
Type
Select from the dropdown.
Hierarchy
In the storage location records, each record has a short name that describes the current part of the hierarchy (e.g. Shelf 1) and a code. As the hierarchy is built, the full name of the storage location is automatically constructed from the name of each part. This is not done for the code — the code can be anything (e.g. it could be just a running number).
The storage location hierarchy is normally constructed in the same manner as the ARC or PHY hierarchy — i.e. by creating a top level record (location) and then using the Add Child Record option to add a child STL (storage location) record to the parent STL record.
The type of record structure in the hierarchy must be retained, i.e. must have a location type at the top level, any number (or none) of sub-location records in the middle, and area and container records at the bottom of the hierarchy.
Any changes to the storage location structure can be done through the Edit record option when viewing the STL record.
The parent record can be removed or changed to another appropriate STL record. The type of record must be set appropriately depending on the type of the new parent, e.g. if the parent is removed, the type of the current record must become a “location”.
The parent record link is a “read only” link as STL records cannot be created “on the fly”.
Example of changing the hierarchy
Here’s an example. We’ve got a location RM1, then a sublocation RM1B1, two sublocations under that RM1B1S1 and RM1B1S2, and two containers under the RM1B1S1 sublocation — RM1B1S1BX1 and RM1B1S1BX2.
location RM1
|
|
sub-location RM1B1
|
|
+--------+--------+
| |
| |
sub-locations RM1B1S1 RM1B1S2
|
|
+-----+-----+
| |
| |
containers RM1B1S1BX1 RM1B1S1BX2
Let’s edit the RM1B1 sublocation and select another location (RM3) as the parent. So now the hierarchy looks like this:
location RM3
|
|
sub-location RM1B1
|
|
+--------+--------+
| |
| |
sub-locations RM1B1S1 RM1B1S2
|
|
+-----+-----+
| |
| |
containers RM1B1S1BX1 RM1B1S1BX2
Now we’ll edit the RM1B1 sub-location and delete the parent record (RM3) altogether. Now the hierarchy looks like this:
location RM1B1
|
|
+--------+--------+
| |
| |
sub-locations RM1B1S1 RM1B1S2
|
|
+-----+-----+
| |
| |
containers RM1B1S1BX1 RM1B1S1BX2