Register online parameters
To specify the sections and fields patrons see when they register online:
- From the Module Menu select Maintenance, OPAC & Enquiry and then Register Online Parameters.
- Select the Language and View you want.
- Make your changes (see below for details).
- Click Save or Save & Close.
- T stands for "Tab" and refers to the tab name in the borrower registration details, e.g. "Register online".
- S stands for "Section" and refers to each section, e.g. "Personal details".
- F stands for "Field" and refers to the individual fields within a section, e.g. "Surname".
You can click Load Defaults to undo any changes you've made and to return to the default set up.
Update details parameters
To specify the sections and fields patrons see when they update their personal details online:
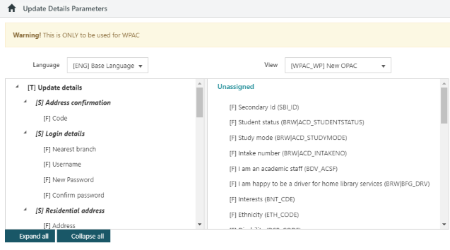
- From the Module Menu select Maintenance, OPAC & Enquiry and then Update Details Parameters.
- Select the Language and View you want.
- Make your changes (see below for details).
- Click Save or Save & Close.
Adding, deleting and moving sections and fields
Click and drag a field to move it to another section.
To include a field in the registration details, click and drag it from the Unassigned list to a section.
If you don't want a particular field to be displayed in the registration details, click and drag it to the Unassigned list.
If you don't want a particular section to be displayed in the registration details then select the section, click Delete and then click Yes at the confirmation prompt. If there are any fields in the section then these will automatically be moved to the Unassigned list.
To add a new section, click to select the , click New Section, and then type a Description.
Adding Notes
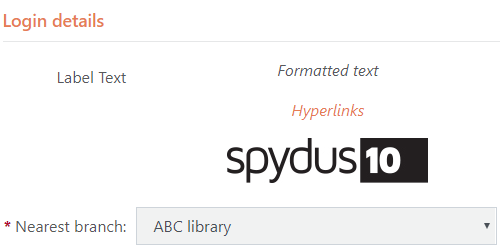
Users have the ability to add rich text notes to the Register Online form and Update Details forms in the OPAC. These Note fields are added via the Register Online Parameters and Update Details Parameters pages, and once created may be re-arranged by dragging-and-dropping like any other field in the UI.

To add a rich text note to the Register Online form or Update Details interface;
- Navigate to either the Register Online Parameters or Update Details Parameters page.
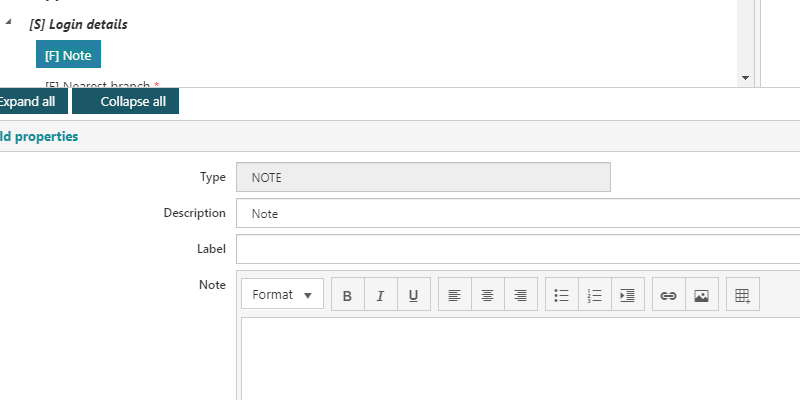
- Select the Section [S] inside which the note will be displayed.
- Click the Add Note button in the action bar.
- NB: The Add Note button will be grayed out unless a Section is selected.
- Enter a Description for the note.
- The Description will not be displayed in the OPAC, but will appear as the name of the field in the parameters UI (e.g. in the screenshot above [F] Note denotes a Field [F] with the Description Note).
- Enter a Label for the note.
- The Label (as with Labels on other fields) will appear as the field name in the OPAC.
- Enter the Note in the rich-text field.
- The Note field may contain formatted text, images, HTML etc
- Click Save or Save & Close.

Tab properties
Description is the heading you'll see in borrower registration.
Information is the information text to be shown under the heading.
Section properties
Label is the section heading to be shown on the page.
Information is the information text to be shown under the section heading.
Warning is the warning text to be shown under the section heading.
Full width display. Select this option if the section is to take up the full width of the page.
Field properties
Type and Description are read-only.
Label
Label is the caption to be shown on the page.
Mandatory
Select this option if the field is mandatory.
Validation message
Validation message is the text to be shown if you try to submit the registration details and the selected field has not been completed.
Selection prompt
Selection prompt is the text to be shown at the top of a dropdown list, e.g. you might show "Select languages" at the top of the list of spoken languages.
Help
Help is the help text to be shown next to the field.
Pattern
Pattern is a regular expression used to recognise a password, e.g. if you specify the pattern ^[\w]{2,10}$ it means that the password must be 2-10 characters long and contain only alphabetic characters and numbers.
Placeholder
Placeholder is the example text to be shown in the field, e.g. "zzz" might be the placeholder for the password field.
Case |
|
Some fields (including name, address, email address) allow the case of the text in the field to be forced to a chosen style. For fields that allow case to be enforced, there will be a dropdown menu labeled Case, with up to four options:
- None - no case enforcement will be applied (he text will retain the case that it was entered in)
- Capitalise - also known as title case, selecting Capitalise will use upper case for the first letter of each word in the field
- Using Capitalise may result in some unexpected behaviour e.g. The surname 'De La Rosa' will be rendered as expected, but McDonald (being a single word) will be rendered as Mcdonald.
- Uppercase - All letters in the field will be uppercase
- Lowercase - All letters in the field will be lowercase
Export and Import
You can use the Export and Import options to port changes from your TEST system to LIVE system, e.g. set up the parameters the way you want in your TEST system, export the parameters to a folder and then import them to your LIVE system.
