The location parameters are where you set up and maintain location details, opening/closing times, holidays etc.
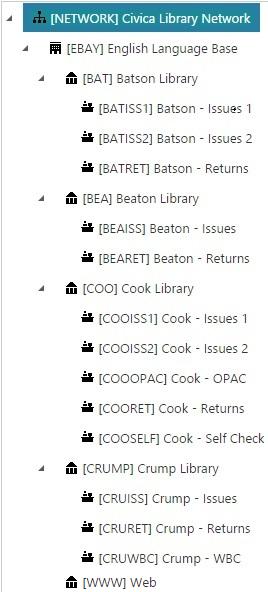
There are four levels of location. At the top, we have the network level. Within the network, we have an institution, within an institution we have branches, and within a branch we have lines.
In the example below you can see we have one institution, four branches, with a number of lines at each branch. You’ll see that we’ve also created a branch called “Web” that has a code “WWW”. You must have a branch with the code WWW. This is used to set up the parameters for external OPAC transactions, for example, whether you can place a reservation on a title on order or a title with no holdings

About lines
You should only create locations at the line level if you want to report on the transactions down to that level, i.e. if you want to keep track of issues, returns, reservations, etc. for each PC. If you don’t want to report on transactions down to that level then just create locations down to the branch level.
In the first example below we haven't specified any lines. So the Circulation/OPAC PCs and self check terminals will all logon at the "Cook Library" branch.
| NETWORK | |
| English Language Base | |
| Cook Library |
In the next example we've specified three lines. We'll select "Cook - Front Desk" when we logon to any PC at the Front Desk, "Cook - OPAC" when we logon to any of the OPAC PCs, and "Cook - Self Check" when we logon to any self check terminals.
| NETWORK | |
| English Language Base | |
| Cook Library | |
| Cook - Front Desk | |
| Cook - OPAC | |
| Cook - Self Check |
In the next example we've specified four lines, with different lines for issues and returns. So we'll select "Cook - Issues" when we logon to any PC used for issuing items at the Front Desk and "Cook - Returns" for any PC used for returning items at the Front Desk.
| NETWORK | |
| English Language Base | |
| Cook Library | |
| Cook - Issues | |
| Cook - OPAC | |
| Cook - Returns | |
| Cook - Self Check |
In the next example we've create different lines for each of the PCs used for issues and returns. "Cook - Issues 1", "Cook - Issues 2", etc.
| NETWORK | |
| English Language Base | |
| Cook Library | |
| Cook - Issues 1 | |
| Cook - Issues 2 | |
| Cook - Issues 3 | |
| Cook - OPAC | |
| Cook - Returns 1 | |
| Cook - Returns 2 | |
| Cook - Self Check |
If there's a line specified under a branch in the parameters then you MUST select both the branch AND a line when you logon to that branch at a Circulation PC or self check terminal. You can’t select just the branch. So be sure to specify as many lines as you need.
Setting up lines for OPAC PCs
It’s a good idea if a site sets up a line for the OPAC PCs in the library. That way you can get statistics for those PCs, e.g. how many renewals/reservations are being made at those PCs.
First you’d set up a line. Call it something appropriate, e.g. if the library is called “Cook Library” you might call the line “Cook – OPAC”.
Then, at each OPAC PC, a staff member would login to the staff catalogue, select “Cook – OPAC” as the location, and then login to the OPAC catalogue. The location is set as a cookie and will stay set for 20+ years (that’s that way we’ve set it up) — unless you change it to something else.
Then close the session. You should do this so that you are not logged on as a user (remember we entered the user ID and password when we logged on). Then start an OPAC session on the PC.
Once this has been set up, renewals, reservations, etc. made from an OPAC PC in the library will be logged under “Cook – OPAC”.
Renewals, reservations, etc. made when the patron is outside the library, e.g. from your PC at home, will be logged under “Web”.
When a borrower tries to reserve an item on this PC, the default pickup location will default to this location. If you don’t specify that “Cook – OPAC” is a pickup location then the pickup location will default to the parent — “Cook Library” in this example.