Reading Challenges give libraries the opportunity to incentivise their borrowers to engage with the library. It's possible to set:
- specific reading lists using SavedLists (e.g. Premier's Reading Lists),
- books that match a given criteria (e.g. subjects, publication year, target audience, collection, etc) using Saved Queries, or
- more general goals without particular titles specified (e.g. read 5 books in a month)
|
This feature requires server version 10.7.1 or higher. |
The Challenges page (Circulation > Reading Challenges > Challenges) allows users to create new challenges, edit existing challenges, and manage registrations for challenges.
Create a New Reading Challenge
To create a new Reading Challenge:
- Navigate to Circulation > Reading Challenges > Challenges and click the New button in the action bar.
- Enter the required (*) Title. The Title should be a few words or single sentence that outlines the Challenge (e.g. Premier's Reading Challenge K-2, Read More eBooks!, etc).
- The rich text Description field may contain formatted text, images and HTML. Use this field to provide context and further information for the Challenge. This field is optional.
- A Start date and End date may be added to a Challenge to encourage participation during a specified period. These dates are optional.
- Note: By themselves, the start and end date do not affect other aspects of the Challenge e.g. Registration will be allowed, OPAC display will not be modified regardless of the dates entered
- Set the Suppress from OPAC option as desired.
- Set the Enable registration option as required.
- Allowing registration gives borrowers the ability to self-register for Challenges that are displayed in the OPAC, and track their own progress against any Goals.
- Staff may also register borrowers for Challenges by using the Manage Registrations feature.
- To add Goals to a Challenge, click the Add button in the Goals section. If added to the Challenge, Goals allow borrowers who have registered to measure their progress. Each Challenge may have any number of Goals (or none); Goals are optional, and may be linked to a set of titles if desired or required.
- Enter the required (*) Title. The Title should briefly describe the Goal.
- The rich text Description field may contain formatted text, images and HTML. Use this field to provide context and further information for the Goal. This field is optional.
- Optionally, a Goal may be linked to a SavedList or a Saved Query. Select the appropriate radio button and click Link to search for a list or query to link to the Goal.
- Click OK to return to the Challenge.
- To change the details of an existing Goal, select it in the Goals list and click Edit.
- To delete a Goal, select it in the Goals list and click Delete.
- To add a display image for a Challenge, either drag and drop the file into the indicated area, or click the Select file button in the Images section.
- The selected image will be shown at the Brief and Full Display of the Challenge, in both the OPAC and WBA.
- The selected image will be shown at the Brief and Full Display of the Challenge, in both the OPAC and WBA.
- To attach files to the Challenge, click the Add button in the Attachments section. Attachments will be linked at the Full Display of a Challenge in the Enquiry module, and may be shown at the Full Display in the OPAC (if selected).
- Either drag and drop the file into the indicated area, or click the Select file button. Once uploaded, the File name field will be populated.
- Add Linking text to describe the file.
- Set the Allow Public Access option as desired.
- This option is set per attachment. i.e. you may have multiple attachments, some of which display the OPAC and others that do not.
- Attachment Notes will display at the OPAC if public access to the attachment is allowed.
- Click OK.
- To change the details of an existing Attachment, select it in the Attachments list and click Edit.
- To delete an Attachment, select it in the Attachments list and click Delete.
- If desired or required, use the Staff ID column in the Staff Assigned section to assign the Challenge to a staff member, either by selecting their name from the dropdown, or typing their name (or user ID) into the field.
- If Staff notes are entered, these will be displayed only in the Challenge edit interface (not at the Full Display - even in staff Enquiry).
- If Notes are entered, these will be displayed at the Full Display of a Challenge record in staff Enquiry and in the Challenge edit interface, but not at the OPAC.
- Click Save or Save & Close.
|
images/CIRCULATION_READING_CHALLENGE_EDIT_INTERFACE_thumb.png 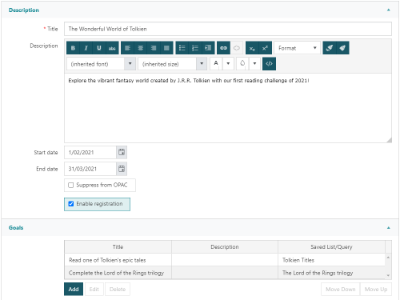
|
images/CIRCULATION_READING_CHALLENGE_OPAC_FULL_DISPLAY_thumb.png 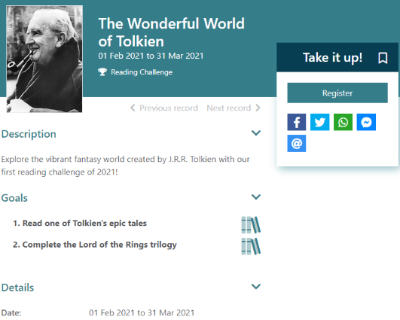
|
Edit a Reading Challenge
There are two ways to access a Challenge for editing:
Via Enquiry
- Navigate to Enquiry > Circulation > Reading Challenges > Challenge.
- Perform a Challenge Search to locate the required Challenge.
- Click through to the Full Display of the Challenge.
- Click the Edit Record button in the action bar.
Add to List
- Navigate to Circulation > Reading Challenges > Challenges.
- Click the Add to List button in the action bar.
- Perform a Challenge Search to retrieve the required Challenge (or set of Challenges).
- Either;
- click to select the required records, then click Select Records, or
- click Select Set to select all records returned by the search
- To open a Challenge in the Edit interface, either;
- double-click the Challenge in the list, or
- select the Challenge in the list and click Edit in the action bar
After making any necessary changes to the Challenge, either Save or Save & Close.
Manage Registrations for Reading Challenges
If the Enable registration option is checked in the Challenge settings, borrowers may be registered by staff - or may register themselves at the OPAC - to track their progress against Reading Challenges and the linked Goals.

To review and take action on registrations for a Challenge;
- Follow the instructions above to Add to List.
- Select the Challenge in the list, then click Manage Registrations in the action bar.
- The Reading Challenge Registration list will show any borrowers who are registered for the Challenge, along with their..
- Registration Date
- Completed status
- Registration Status
- Completed Date
Registering a borrower for a Challenge
- To register a borrower for the selected Challenge, follow the steps above to enter the Reading Challenge Registration page for the required Challenge.
- Click the New button in the action bar.
- Enter the borrower ID, either by;
- typing or scanning their barcode into the Borrower field
- clicking the Link button and performing a Borrower search
- Update any additional registration details as required.
- Click Save or Save & Close.
Editing a Challenge registration
- Follow the steps above to enter the Reading Challenge Registration page for the required Challenge.
- Select the registration to be edited, then click the Edit button in the action bar.
- Update any registration details as required.
- Click Save or Save & Close.
It is also possible to edit a Reading Challenge Registration from the Brief or Full Display.
- Navigate to Enquiry > Circulation > Reading Challenges > Registration search form.
- Search for the borrower and challenge.
- Either select the record row in the Brief Display set, or click through to the Full Display.
- Click the Edit Record button.
- Update any registration details as required.
- Click Save or Save & Close.