A red asterisk against a user group shows that changes have been made to it that haven't yet been saved.
A user group can only be deleted if that group has no links to active users.
The User Group is where the privilege levels for a group of users is set, and widget roles assigned.
To add, edit or delete a user group:
- From the Module Menu select Maintenance, General and then User Groups.
- Do any of the following.
- Click New to add a new user group (see below for details).
- Select the group you want and then click Edit to make changes to it.
- Select the group you want and then click Delete to delete it.
- Click Save or Save & Close.
You can also edit or delete a user group in Enquiry.
- From the Module Menu select Enquiry, Search Holdings and then Boolean Query.
- Enter the query FORMAT:USERGRP to list all the user groups.
- Select the user group you want, and then click Edit Record. You can then add, edit or delete user groups.
- Click Save or Save & Close.
Branch restricted
If Branch restricted is selected then users in the selected group can only edit records belonging to the location specified in their user account. This applies to box sets, bulk item deletion, bulk item maintenance, change item status, item maintenance and materials maintenance.
If no location is specified in the user account then the user can edit records belonging to any location — even if Branch restricted is selected in the user group.
If Branch restricted is not selected then users in the selected group can edit records belonging to any location.
Roles
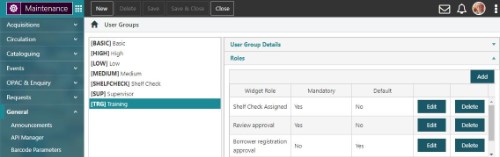
To make a Widget available to a User Group:
- Navigate to Maintenance > General > User Groups.
- Select the User Group from the left-hand pane of the page.
- In the Roles section, click Add.
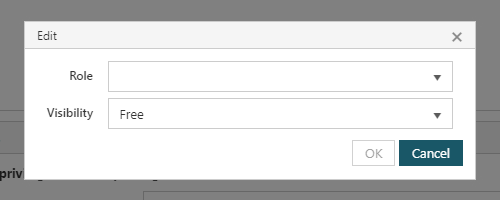
- Select the Widget from the Role drop-down.
- Select the desired Visibility of the chosen Widget for this User Group.
- Mandatory will display the Widget for all Users in the group, and it cannot be removed from the Home page
- Default will display the Widget by default, but users may remove it from the Home page if desired
- Default Widgets will only be displayed for a user account when it is newly created, or the user group is changed. i.e. if a widget is added to a user group, and its Visibility is set to Default, it will not be automatically added to the Home screen for existing users in the group
- Default Widgets that have been removed may be re-added by the User
- Free will allow Users in this group to add and remove this Widget from their page as desired
Privileges
This is where the privilege level for the various modules is specified for the selected group. These privilege levels will then apply to the users in this group. Click the up or down arrow to select the desired level.
If Synchronise all levels is selected then setting the privilege level for one module will set that privilege level for all modules.
|
Tab or click anywhere on the screen to have the change you make to one level apply to all levels. |
Click Zero to set the privilege level for all modules to 0, or Max to set the privilege level for all modules to 4.
|
To avoid overly complicating privilege settings, the default Max is 4. However, privilege levels may be set anywhere from 0 to 99. |
To specify the privilege level for the different options within each module, use the Privilege Manager.