You can manage the registration from the Event List or from the list of sessions for the event, or from the Full Display of the relevant Event or Event Session record in Enquiry.
- If Event level registration is selected in the event, manage registration from the Event List.
- If Event level registration is not selected in the event, manage registration from the list of sessions for the event.
An event/session must be approved before managing the registration for it.
The registration details are the same in each case. In the example below, we’re managing the registration for a session.
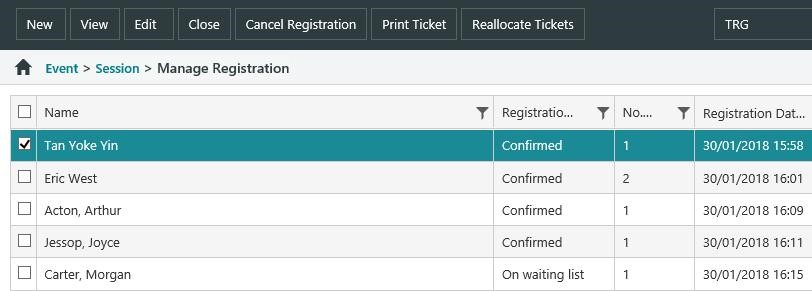
If the session has passed, it will be displayed as Complete in the Registration Status column, e.g. “Confirmed (Complete)”.
Add a new registrant
To add a new registrant to the list:
- Click New.
- Specify the number of tickets. The maximum number of tickets will be limited by the Max tickets per registration parameter.
- If the attendee;
- is a member of the library, leave the Borrower option selected and enter the borrower’s barcode in the field. If the borrower’s barcode is not known, click Link to search and find them.
- is not a member of the library, then select the Guest option. Fill in details of their name, email address, contact numbers and mailing address.
- Click Save & Close.
If there's a registration fee
If there's a registration fee, a prompt for payment will appear (unless registering as a borrower and Set registration status to ‘Confirmed’ rather than ‘Pending payment’ is set to Yes in the Maintenance > Events > General Parameters).
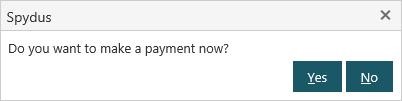
- Clicking Yes and paying in full will print a ticket with the status Confirmed.
- Clicking Yes and making a partial payment, or cancelling from the payment dialog will print a ticket with the status Pending payment.
- Clicking No will print a ticket with the status Pending payment.
If not paying the fee at the point of registration, or if not paying in full, there will be a Make Payment button on the action bar when selecting a registrant in the list. Click this button to make a payment.
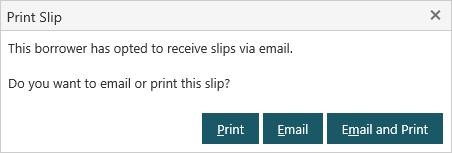
If registration is confirmed
If the registration status is confirmed then a ticket will be printed. If the borrower is set up to receive slips via email, or if the guest has an email address, then there will be an option to either Print, Email, or Email and Print the ticket.
If there are no tickets available
If there are no tickets available — i.e. we’ve already reached the maximum number of registration specified for the event/session — borrowers/guests may be added to the waiting list.
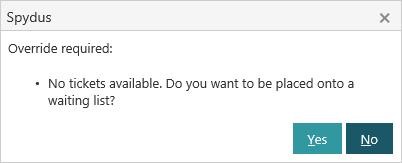
Click Yes to automatically send an email to the registrant advising that they are on the waiting list.
The options for How did you hear about this event are set up and maintained in the EVFND lookup table.
Sort the registrants
The list of registrants may be sorted by clicking a column heading.
Select registrants
To select one registrant:
- Click the checkbox next to the registrant, or
- Click anywhere in the row except the checkbox. This will automatically deselect any other registrants that are currently selected.
To select multiple registrants:
- Click the checkbox next to the registrants.
- Use SHIFT+Click to select consecutive registrants. Click anywhere in the row except the checkbox. Click the first row, press and hold the SHIFT key, and then click the last row desired.
- Use CTRL+Click to select specific registrants. Click anywhere in the row except the checkbox.
Select or deselect the checkbox in the first column heading to select or deselect all the registrants.
View registration details
To view details of a registration:
- Select the registrant want.
- Click View or right-click and View.
Edit registration details
To edit registration details:
- Select the registrant you want.
- Click Edit or right-click and Edit.
- Make your changes.
- Click Save & Close.
Confirm a registration
To confirm a registration that’s currently on the waiting list:
- Select the registrant or registrants.
- Click Confirm Registration.
This will trigger an email to the registrant to say that registration has been confirmed.
Cancel a registration
To cancel a registration:
- Select the registrant or registrants you want.
- Click Cancel Registration.
If Do not refund registration fee automatically is set to No in the Event General Parameters, then the registration will be automatically refunded to the borrower. If the fee has been partially paid, then the amount paid is refunded, and the outstanding amount waived.
Make a payment
The fee can be paid when the registration is first added. If the registrant doesn't pay the fee when registering, or doesn't pay in full, there will be a Make Payment button on the action bar when selecting a registrant in the list. Click this button to make a payment.
Reprint a ticket
The ticket is automatically printed (or emailed) when the registrant is added to the list with the status “Confirmed”. To print or email the ticket again:
- Select the registrant.
- Click Print Ticket.
Reallocate tickets
Use Reallocate Tickets to change the number of tickets a registrant has. When you reallocate tickets, we cancel the old registration and add a new one. Here’s an example.
- Select the registrant. In this example, the borrower has a confirmed registration for 1 ticket.

- Click Reallocate tickets.
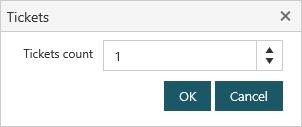
- Change the ticket count and click OK. In this example the ticket count is changed from 1 to 2. This cancels the previous registration for 1 ticket, and adds a new registration for 2.
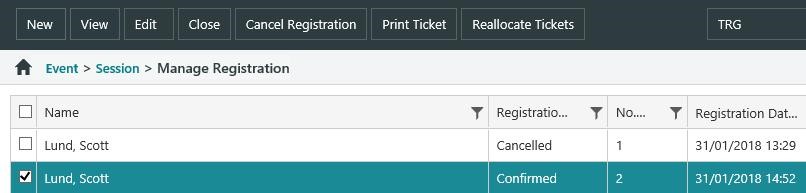
The new tickets will be automatically printed, and a cancellation email notice will be automatically sent to the registrant.
Tickets may only be reallocated if:
- there is no registration fee, and
- there are no registrants on the waiting list.