|
This feature requires license version 11.2 or higher. |
The Application Settings page allows users to customise elements of the Spydus WBA. To access Application Settings, navigate to Maintenace > General > Application Settings.
The Navigation Menu tab allows the customisation of Spydus menus and options
The Audio Settings tab allows the configuration of notification sounds in the Circulation module.
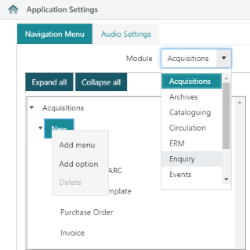
Navigation Menu
The Navigation Menu tab allows users to add, edit and delete customised collapsible menus and custom menu links in each module e.g. booking placement pages for specific collections of materials, customised cataloguing worksheets, links to the OPAC, or even links to content outside Spydus.
This interface allows users to create entirely new structures of menus and sub-menus, or to add to menus that already exist within Spydus.
It should be noted that the dropdown search boxes for each module (e.g. the 'Borrower or Item' search in Circulation) cannot be modified.
The Search pages menu cannot be changed in this interface, but can be controlled via Search Pages Parameters.
|
The Add menu function can be used to:
The Add option function can be used to add an option to any menu.
It is not possible to add a menu to an option i.e. an option will always be the final branch of a tree. |
Adding or editing menus
To create a menu heading or sub-menu;
- Navigate to Maintenance > General > Application Settings.
- Ensure that the Navigation Menu tab is selected.
- Select the required Module from the drop-down menu.
- To add;
- a top-level menu, right-click the module name in the menu pane and select Add menu
- a sub-menu, right-click the menu heading in the menu pane and select Add menu
- In the Menu properties pane on the right-hand side, enter the desired Label for the new menu.
- Set the Enabled state as required
- Press the Tab key or click out of the field, then click Save or Save & Close.
If it is not desired for the menu to display immediately, un-check the Enabled box to allow configuration (e.g. additional sub-menus or options) before displaying to Spydus users.
To edit a menu or sub-menu;
- Navigate to Maintenance > General > Application Settings.
- Ensure that the Navigation Menu tab is selected.
- Select the required Module from the drop-down menu.
- Select the menu or sub-menu to be changed (menus containing custom content are displayed in bold).
- In the Menu properties pane on the right-hand side, enter the desired Label for the menu & set the required Enabled state.
- Press the Tab key or click out of the field, then click Save or Save & Close.
To delete a menu or sub-menu;
- Navigate to Maintenance > General > Application Settings.
- Ensure that the Navigation Menu tab is selected.
- Select the required Module from the drop-down menu.
- Right-click the menu or sub-menu to be deleted and select Delete.
- A pop-up will appear with the message 'Do you want to delete this menu?'. Ensure that the correct menu is selected before proceeding, as deleting a menu will delete all sub-menus and options below it.
- Click Yes. Click Save or Save & Close.
Adding or editing options
To add an option to a menu;
- Navigate to Maintenance > General > Application Settings.
- Ensure that the Navigation Menu tab is selected.
- Select the required Module from the drop-down menu.
- Right-click the menu where the option is to be added, and select Add option.
- In the Option properties pane on the left-hand side;
- Enter a Label for the new option
- Enter the URL for the new option
- Set the Enabled state as required
- Check the Open in new tab option if required
- links to content outside of Spydus will always be opened in a new tab
- Set the Privilege required to view this option
- to access the option, the user group privilege level for the selected module must be greater than or equal to the Privilege set
- options in the Enquiry module will not require a privilege value, as all users have Enquiry access
- Click Save or Save & Close.
To edit an option;
- Navigate to Maintenance > General > Application Settings.
- Ensure that the Navigation Menu tab is selected.
- Select the required Module from the drop-down menu.
- Select the option to be changed (menus containing custom content are displayed in bold).
- In the Option properties pane on the left-hand side;
- Enter a Label for the new option
- Enter the URL for the new option
- Set the Enabled state as required
- Check the Open in new tab option if required
- Set the Privilege required to view this option
- Click Save or Save & Close.
To delete an option;
- Navigate to Maintenance > General > Application Settings.
- Ensure that the Navigation Menu tab is selected.
- Select the required Module from the drop-down menu.
- Right-click the option to be deleted and select Delete.
- A pop-up will appear with the message 'Do you want to delete this menu?'. Click Yes to proceed.
- Click Save or Save & Close.
Example URLs for options
Some common uses for custom links include:
Links to booking from a specific collection and/or location
To link to the booking page for all bookable materials from a specific collection, use the URL;
- /cgi-bin/spydus.exe/PGM/CAT/CCOPT/B/MATENQ/APP?CLN=COLX*Collection Description
...where COLX is the collection code, and Collection Description is the name of the collection e.g. /cgi-bin/spydus.exe/PGM/CAT/CCOPT/B/MATENQ/APP?CLN=MTGRM*Meeting Room
To link to the booking page for all bookable materials from a specific location, use the URL;
- /cgi-bin/spydus.exe/PGM/CAT/CCOPT/B/MATENQ/APP?LOC=LOCX*Location Description
...where LOCX is the location code, and Location Description is the name of the location e.g. /cgi-bin/spydus.exe/PGM/CAT/CCOPT/B/MATENQ/APP?LOC=NYC*New York City
It might also be desirable to use the $(CURRENT.BRANCH.CODE) placebolder (where the Spydus user is logged in) in the URL. This allows the same option to be used for booking at each location, rather than creating a separate option for each. In this case, the URL would look like:
- /cgi-bin/spydus.exe/PGM/CAT/CCOPT/B/MATENQ/APP?&LOC=$(CURRENT.BRANCH.CODE)*Current Location
To link to the booking page for all bookable materials from a specific collection and collection, use the URL;
- /cgi-bin/spydus.exe/PGM/CAT/CCOPT/B/MATENQ/APP?CLN=COLX*Collection Description&LOC=LOCX*Location Description
Links to cataloguing worksheets
To link to a cataloguing worksheet, use the URL;
- /cgi-bin/spydus.exe/PGM/CAT/BIBENT/APP?FMT=FMT
...where FMT is the format of the record being catalogued.
Bibliographic Format Codes
Book (Brief) BIBKB Book (Full) BIBK Journal Article BIJA Manuscript BIMSS Newspaper Article BINA Continuing Resources BISE Maps BIMP Mixed Materials BIMX Music CD BICD Printed Music BISC Talking Book (Cassette) BITBA Talking Book (CD) BITBD Photograph BIPHO Videocassette BIVID Videodisc (DVD) BIDVD
Audio Settings
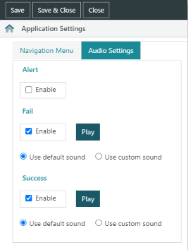
The Audio Settings tab allows users to enable or disable notification sounds in the Circulation module, and to set custom notification sounds.
To enable or disable an audio notification;
- Navigate to Maintenace > General > Application Settings, and select the Audio Settings tab.
- Set the state of the Enable checkbox for the desired audio notification.
- Click Save or Save & Close.
|
If an audio notification is enabled, clicking the Play button will allow users to test play the audio file. |
To set a custom sound for an audio notification;
- Navigate to Maintenace > General > Application Settings, and select the Audio Settings tab.
- Set the Use custom sound radio button.
- Click the Select file button, browse to the location of the audio file and double-click to select it.
- Click Save or Save & Close.
|
MP3 is the only supported audio file format for upload in Audio Settings. |
If enabled, the Alert sound will be played if any alert is displayed when an item is returned or issued (e.g. item goes in transit, is allocated to a reservation etc).
If enabled, the Fail sound will be played if an item barcode is invalid.