Once you have opened a file of MARC records, you can use the Select/Change option to select specific records and make the same change to all of them.
To do this:
- Do one of the following to select the records you want to change.
- Select the records using the mouse, click Select/Change on the Edit menu, click Current selection and then click Next.
- Click Select/Change on the Edit menu, click Select all and then click Next.
- Click Select/Change on the Edit menu, click Select, specify your select criteria and then click Next.
- Click the Change checkbox.
- To restrict the change to a particular field, do one of the following:
- Select the Leader checkbox.
- Enter the tag number in the Tag box.
- Do one of the following:
- Select the Whole field option to apply the change to the whole field.
- Select the Field content option to restrict the change to specific text or character positions within the field.
- Select the Indicator option to restrict the change to a specific indicator. This option is not available if you've selected the Leader checkbox.
- Select the Tag option to change a tag. This option is not available if you've selected the Leader checkbox.
- Do one of the following:
If you have selected the Leader checkbox and the Whole field option
- Enter the new text in the Replacement text box.
If you have selected the Leader checkbox and the Field content option
- Specify the Start position and Length, and then enter the new text in the Replacement text box.
If you have entered a tag number and selected the Whole field option
- Select Replace and enter the new text in the Replacement text box, OR
- Select Delete, OR
- Select Append and enter the new text in the Replacement text box.
If you have entered a tag number and selected the Field content option
- Select Replace, enter the existing text in the Variable field text box and the new text in the Replacement text box, OR
- Select Delete and enter the existing text in the Variable field text box, OR
- Select Append and enter the new text in the Replacement text box.
If you have entered a tag number and selected the Indicator option
- Select indicator 1 or 2, enter the existing text in the Text box, and then enter the new text in the Replacement text box.
If you have entered a tag number and selected the Tag option
- Select Replace and type the new tag in the Tag number box.
- Click OK to make the change.
Example 1: changing indicators
Let’s work through an example.
At one time the MARC standards specified that hyphenated surnames had indicator 2 in tags 100, 400, 600 and 800 set to “2”, but now have indicator 2 set to “1”. We can use the Select/Change command to make this change to the records in a file.
- Open a file of MARC records.
- Click Select/Change on the Edit menu.
- Click Select All and then click Next.
- Click Change.
- First we’ll make the change in tag 100, so enter 100 in the Tag box.
- Select the Indicator option.
- Select Indicator 2, enter 2 in the Text box, and 1 in the Replacement box.
- Click OK to make the change.
- Repeat steps 2 to 8 for tag 400, 600 and 800.
Example 2: appending new tags
Let’s see another example.
This time we’ll use Select/Change to append a 984 tag to the records in a file. In the $a subfield we’ll specify the NUC code (the National Union Catalogue code) and in the $c subfield we’ll specify a holdings statement.
- Open a file of MARC records.
- Click Select/Change on the Edit menu.
- Click Select All and then click Next.
- Click Change.
- Enter 984 in the Tag box.
- Select the Whole field option.
- Select Append.
- Enter #aVAB#cHeld in the Replacement text box, i.e. we’re specifying VAB as the NUC code and Held as the holdings statement.
- Click OK to make the change.
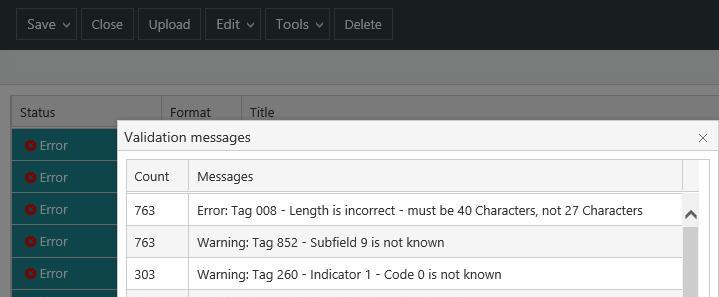
Example 3: length of 008 tag incorrect
In this example, we’ve validated our records and found several cases where the length of the 008 tag is incorrect.
Let’s see how to correct these errors!
- Open a file of MARC records.
- Click Validate All Records on the Tools menu to validate all the records in the list, and then click List All Validation Messages on the Tools menu to display the messages. Count shows the number of records that have each message.
- Click the message you want, and then click Select to select these records.
- Click Select/Change on the Edit menu.
- Click Use current selection and then click Next.
- Click Change.
- In this example we’re correcting the length of tag 008, so enter 008 in the Tag box.
- Select the Field content option.
- Select Replace.
- In this example we had only 27 characters when there should be 40. So enter 27 as the Start position and 13 as the Length, i.e. 40 - 27 = 13.
- Enter 13 spaces in the Replacement text box, i.e. press the Spacebar 13 times.
- Click OK to make the change.
In our example above, we had too few characters, i.e. 27 instead of 40. If there are too many characters then use Delete rather than Replace. For example, say there are 43 characters and there should be only 40. On the Change Record(s) Data dialog:
- Select the Field content option.
- Select Delete.
- Enter 40 as the Start position and 3 as the Length, i.e. we’ll delete the three characters after the 40th.