The SpydusGO mobile application for iOS and Android has been developed to facilitate flexibility in the delivery of a number of core library services and functions.
Features such as borrower registration, borrower validation, and loan issues and returns, allow roaming staff to perform general Circulation duties from the floor of the library, or from mobile library locations, without requiring computers or WiFi dongles*. Stocktake and Bulk Item Deletion functions allow staff to perform collection maintenance from the floor. The Events functions facilitate the marking of attendance for ticketed and non-ticketed Events, and review of upcoming Events.
This introduction to SpydusGO will contain a brief description of each feature available in the application and some helpful tips. If you have any further questions after reading this document, please contact the Civica Service Desk for more information. If you have any suggestions for new or enhanced functions for SpydusGO, please visit the Spydus Ideas Portal.
...but we don't want our staff using the SpydusGO mobile app!
Access to the SpydusGO app can be enabled or disabled at a server level by Civica staff if requested. Log a ticket via the Civica Service Desk to request that access to the app be switched on or off.
Prerequisites
Spydus minimum versions
The minimum requirements for SpydusGO are:
| Server version: | 10.1.2 or higher |
| WBA version: | W10.5C or higher |
Note on registering new borrowers: New borrower registration in SpydusGO is supported from Spydus server version 10.1.5 and forward (or from Spydus 10.1.4 where the new Borrower Registration Parameters are enabled).
Before attempting Borrower registration in SpydusGO, a library staff member must access the Borrower Registration Parameters interface in the web-based apps (WBA) in order to generate the SpydusGO registration form.
Supported barcode formats
The following barcode formats are supported in SpydusGO:
- Aztec
- Code 128
- Code 39
- Code 93
- EAN13
- EAN8
- PDF417
- QR
- UPC-E
Installing the app
SpydusGO is available for iOS and Android on the Apple App Store and the Android Play Store. To install SpydusGO, just search the store for 'SpydusGO', and tap the Install button.
Logging in and setting permissions
Launch the app by tapping the SpydusGO icon in your app drawer. You will be taken to the SpydusGO welcome screen, with a short description of the app and its features. Tap Next. Enter your library's Spydus URL (e.g. yourlibrary.spydus.com), then tap Next. After the app has verified that you have entered a valid Spydus URL, tap the screen to access the login form.
|
images/SPYDUSGO_WELCOME_thumb.png 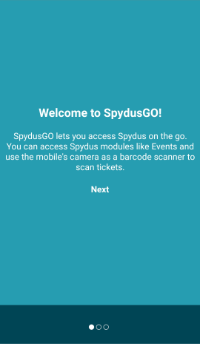
|
images/SPYDUSGO_SPYDUS_URL_thumb.png 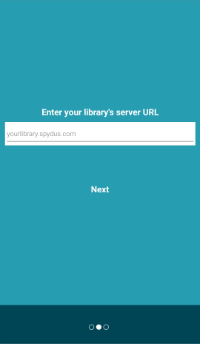
|
images/SPYDUSGO_ALL_SET_thumb.png 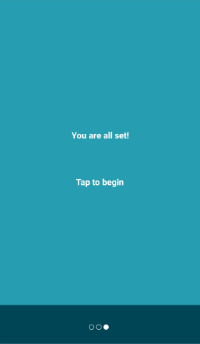
|
| At the Welcome screen, tap Next. | Enter your Spydus URL, then tap Next. | Tap the screen to log in. |
|
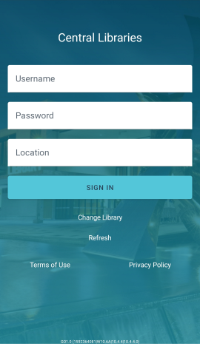
images/SPYDUSGO_LOGIN_thumb.png
|
A note on security features
In order to ensure account security and prevent the capture of sensitive information, the ability to take screenshots has been disabled in the Android version of SpydusGO.
Apple developer tools do not allow this same feature to be enabled in iOS, so this restriction does not apply in the Apple version of SpydusGO.
On Android devices, SpydusGO requires an active internet connection at all times in order to utilise Google Play Services' checking for code tampering.
SpydusGO Features
|
images/SPYDUSGO_FEATURES_thumb.png 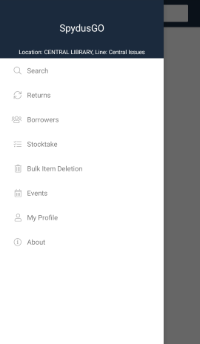
|
Upon successfully logging in, users will land on a blank page with a search bar at the top, and a 'hamburger' menu icon in the top-left corner.
Tap the menu icon to view the features available in the SpydusGO application.
|
Search
|
images/SPYDUSGO_SEARCH_BAR_thumb.png 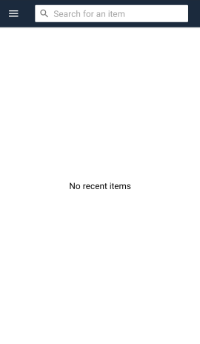
|
This search bar will perform a traditional Spydus Search Holdings - Quickfind, that is, a search that returns bibliographic records with holdings.
Performing a search will show results in a format familiar to users of the Spydus Enquiry module, with consistent sorting and refinement options.
|
Due to the mobile app format, some options are nested under icons. At the search results screen, you can;
|
images/SPYDUSGO_SEARCH_RESULTS_thumb.png 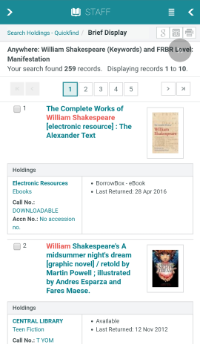
|
images/SPYDUSGO_SEARCH_FACET_thumb.png 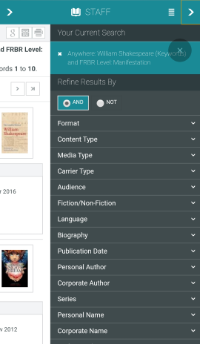
|
images/SPYDUSGO_SEARCH_OPTIONS_thumb.png 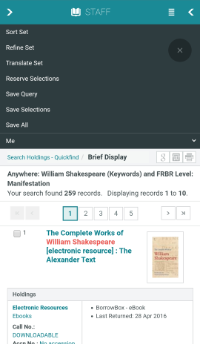
|
| Review the returned set. | Tap the  icon to reveal search refinement facets. icon to reveal search refinement facets. |
Tap the  icon to reveal search options. icon to reveal search options. |
As shown in the screenshot, SpydusGO allows users to place reservations on entire search sets, or on selected records, under the nested options. Just tap the Reserve Selections/Reserve Set option and enter the borrower's barcode.
Item Notes
From the Full Display of an Item record, tap the vertical ellipsis and select Edit Note to either add or edit an item note. If an item has a note, and the ITMNOTE Alert is not being suppressed, the note will be displayed when the item is returned in both the SpydusGO app and the WBA Circulation module.
|
images/GO13_EDIT_NOTE_thumb.png 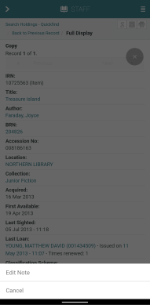
|
images/GO13_ADD_NOTE_thumb.png 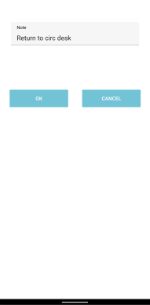
|
images/GO13_ITMNOTE_thumb.png 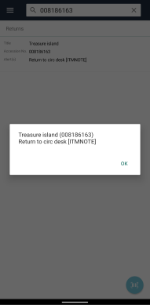
|
| Add Note | Edit Note | ITMNOTE Alert |
A note on SavedLists
Most SavedList functionality has been reproduced in SpydusGO. This include;
- creating new SavedLists
- adding records to SavedLists
- emailing SavedLists
However, SpydusGO does not currently support downloading SavedLists to mobile devices.
| Tap the Close icon to return to the Search interface. |
|

|
images/SPYDUSGO_SEARCH_RECENT_thumb.png 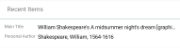
|
Any recently viewed bibliographic records will be listed under the Recent Items header. |
Returns
|
images/SPYDUSGO_RETURNS_CLEAN_thumb.png 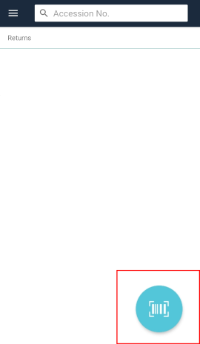
|
The SpydusGO returns page offers a simple, clean interface for returning items, both from loan and in-house, with the ability to use the device's in-built camera as a barcode scanner, or to enter barcodes manually using the Accession No. field.
To access the camera, tap the blue 'Scan' icon in the bottom left of the Returns screen.
You may need to grant permission to use the device camera to the SpydusGO app. |
The barcode scanner overlays a solid red line to indicate the reticule to place over the barcode. Hold the device steady over the barcode until the item has been scanned.
Once the barcode has been read, a blue-green circle will begin to spin to indicate that Spydus is processing the item.
|
images/SPYDUSGO_RETURNS_SCANNER_thumb.png 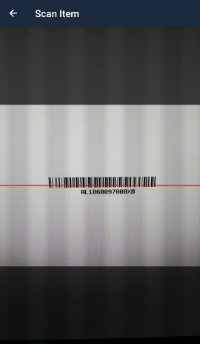
|
|
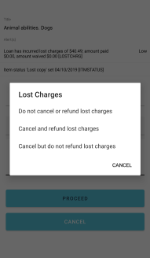
If there are any alerts or messages on the item - that Spydus is configured to display at return - these will be displayed.
If any of these require a Reason or Note to override an alert, SpydusGO will provide an interface to take action on these.
These may be selected and modified in the same manner as the WBA interface allows - just tap the fields to change options, or to pull up the on-screen keyboard to enter notes. |
images/SPYDUSGO_RETURNS_REASON_NOTE_thumb.png 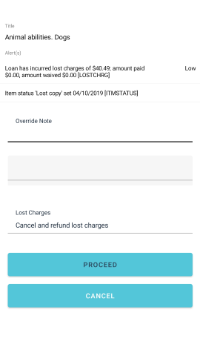
|
images/SPYDUSGO_RETURNS_REASON_PROCEED_ACTION_thumb.png
Select an alternate Proceed action. |
images/SPYDUSGO_RETURNS_REASON_OVERRIDE_thumb.png
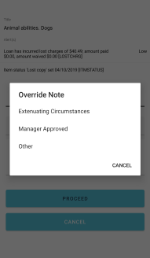
Select an alternate Override Note. |
|
Once any alerts and prompts have been actioned, the user is returned to the Scan Item interface with the barcode scanner ready to scan the next item.
Once all required items have been scanned, the user may tap the Back arrow to return to the Returns interface. Any recently returned items with be listed here, with relevant Alerts displayed.
Users may scroll through this list to review recently returned items. |
images/SPYDUSGO_RETURNS_RECENTLY_RETURNED_thumb.png 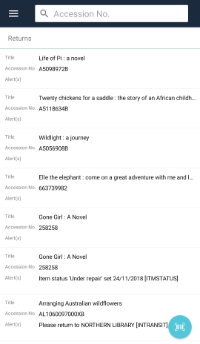
|
Borrower
|
images/SPYDUSGO_BORROWER_CLEAR_thumb.png |
The Borrower features of SpydusGO allow:
|
Registration
| To register a new borrower, tap this button to load the registration form: |  |
|
As mentioned above, this registration form is a modified version of the default Quick Registration form. There is some limited customisation available by editing the Mobile Form in Borrower Registration Parameters.
If this form does not capture all required borrower details, it is recommended to register borrowers to an interstitial category. Library staff can then query that category in WBA Enquiry and contact borrowers for any additional required details.
Once the minimum mandatory details have been entered, tap Save to complete borrower registration. |
images/SPYDUSGO_BORROWER_REGISTRATION_thumb.png 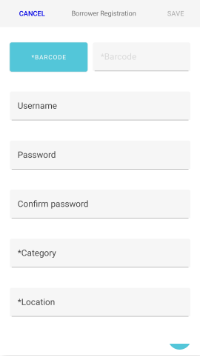
|
images/SPYDUSGO_BORROWER_REGISTRATION_2_thumb.png 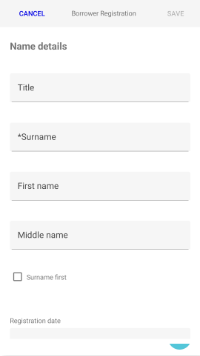
|
images/SPYDUSGO_BORROWER_REGISTRATION_3_thumb.png 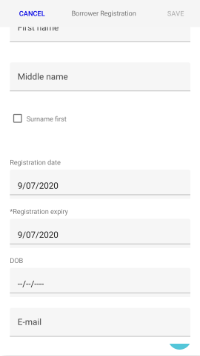
|
Loading a borrower
| The simplest way to load a borrower in SpydusGO is to scan their borrower card. Tap this button to access the barcode scanner: |  |
|
Note: This method is to load in an existing borrower, not to register a new borrower.
The barcode scanner overlays a solid red line to indicate the reticule to place over the barcode. Hold the device steady over the barcode until the borrower's card has been scanned.
Once the barcode has been read, a blue-green circle will begin to spin to indicate that Spydus is processing the borrower. |
images/SPYDUSGO_BORROWER_SCAN_BRW_ID_thumb.png 
|
| If the borrower card is not present to scan, use the Search for a borrower field to query Spydus for a barcode, borrower name, or borrower ID. Click the tick icon at the Borrower record Full Display to load their details into SpydusGO. |  |
|
Once a borrower has been loaded into SpydusGO, users can view their abridged details, and a number of tiles.
|
images/SPYDUSGO_BORROWER_TRN_CLEAR_thumb.png |
images/SPYDUSGO_BORROWER_TRN_TILES_thumb.png 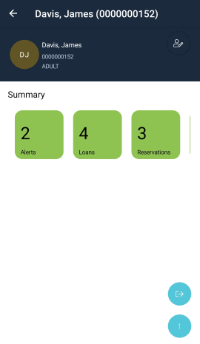
|
|
images/SPYDUSGO_BORROWER_RSV_VIEW_thumb.png 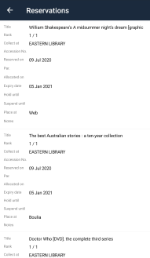
|
images/SPYDUSGO_BORROWER_LOANS_VIEW_thumb.png 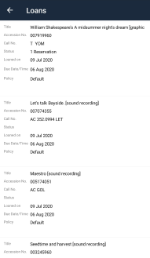
|
images/SPYDUSGO_BORROWER_ALERTS_VIEW_thumb.png 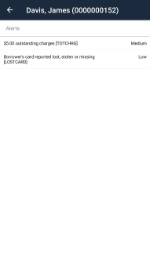
|
| Reservations List | Loans List | Alerts List |
Change Borrower Category
| To change a borrower's category, at the Borrower Summary page, tap the Edit Borrower icon. |
|
At the Borrower Registration screen, tap the current Category to bring up the list of available Borrower Categories.
Select the preferred category, then tap Save.
Currently, Borrower Category is the only detail of Borrower Registration that may be managed from the SpydusGO app. |
images/SPYDUSGO_BORROWER_EDIT_CATEGORY_thumb.png 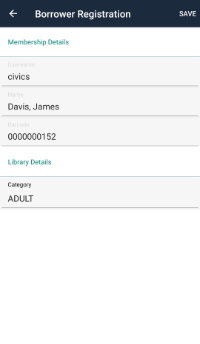
|
images/SPYDUSGO_BORROWER_EDIT_CATEGORY_SELECT_thumb.png 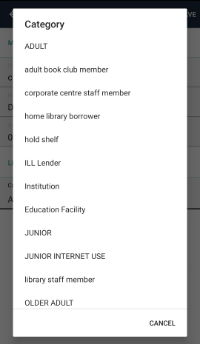
|
Issuing Loans
| To issue loans to a borrower, first load the borrower in, then tap the Issue icon: |
The Issues interface is identical to the Returns interface. As with the Returns interface, the Accession No. search field only supports manual barcode entry.
| Tap the 'Scan' icon to use the device's built-in camera as a barcode scanner. | |
|
Any alerts that may prevent issue, or require override in order to issue, will be displayed as expected.
As in the web-based apps, to override alerts will require sufficient privilege.
If the user has sufficient privilege, the Proceed and Cancel options will be displayed.
Override reasons are populated by LNVRN lookup table. |
images/SPYDUSGO_BORROWER_ISSUE_ALERTS_thumb.png 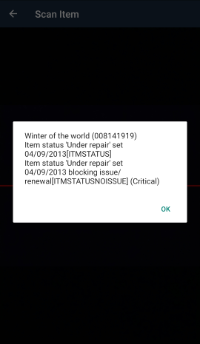
|
images/SPYDUSGO_BORROWER_ISSUE_OVERRIDE_ALERT_thumb.png 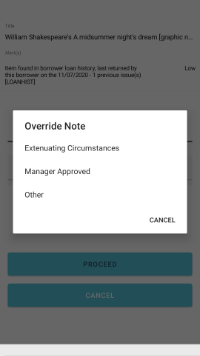
|
|
When an item is successfully issued with no alerts, a simple ribbon notification will be shown. After issuing an item, the barcode scanner will remain on-screen. Continue to issue additional items as required.
Once all required items have been issued, tap the on-screen back button twice to return to the Borrower Summary. |
images/SPYDUSGO_BORROWER_ISSUE_CONFIRM_thumb.png 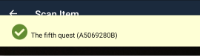
|
Renewing Loans
To renew items already on loan to a borrower, simply issue the item (by scanning its barcode) as though it were a regular loan. Spydus will appropriately apply loan renewal policy and parameters.
Placing Reservations
|
To place a reservation for a borrower who has been loaded into SpydusGO, tap the blue ellipsis button at the Borrower Summary screen and select Reserve Items.
|
images/SPYDUSGO_BORROWER_ELLIPSIS_OPTIONS_thumb.png 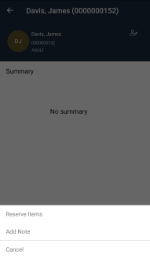
|

The Search for an item to reserve field will perform a Search Holdings - Quickfind search to retrieve bibliographic records with holdings.
If a set of records is retrieved, a user may tap multiple checkboxes to select more than one record, or tap a single title to navigate to the Full Display.
|
images/SPYDUSGO_BORROWER_PLACE_RESERVATION_thumb.png 
|
Once the desired record/s are selected, tap the 'hamburger' menu and then tap Place Reservation (or Reserve Selections for multiple records).
Select/enter the details of the reservation, then tap Place Reservation.
The pickup location will default to the logged in location, and other details will be set to policy defaults. |
images/SPYDUSGO_BORROWER_RSV_DETAILS_thumb.png 
|
Despite being displayed in the 'hamburger' menu, the Edit Record function is currently not supported in the SpydusGO app.
Manage Messages
Borrower Messages can be added, edited or deleted in SpydusGO.
|
images/SPYDUSGO_ADD_MESSAGE_thumb.png 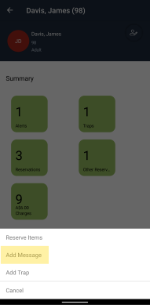
|
Add MessageTap the Add Message option nested under the blue vertical ellipsis menu button to add a message to the borrower account.
A new message may also be added by tapping the Messages tile (visible if the borrower has at least one message on their account), then tapping the vertical ellipsis button and selecting Add. |
Edit or Delete a MessageIf there is at least one borrower message on the account, the Messages tile will appear on the Borrower screen.
Tap the Messages tile to view any messages on the borrower's account.
Select a message in the list by tapping it, the tap the vertical ellipsis in the bottom right hand corner to Edit or Delete the selected message, or to Delete All messages. |
images/SPYDUSGO_EDIT_DEL_MESSAGE_thumb.png 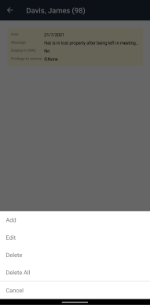
|
Manage Traps
Borrower Traps can added, edited or deleted from the SpydusGO app.
|
images/SPYDUSGO_ADD_TRAP_thumb.png 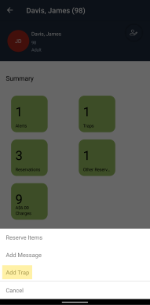
|
Add TrapTap the Add Trap option nested under the blue vertical ellipsis menu button to add a trap to the borrower account.
A new message may also be added by tapping the Traps tile (visible if the borrower has at least one trap on their account), then tapping the vertical ellipsis button and selecting Add. |
Edit or Delete a TrapIf there is at least one borrower message on the account, the Traps tile will appear on the Borrower screen.
Tap the Traps tile to view any traps on the borrower's account.
Select a trap in the list by tapping it, the tap the vertical ellipsis in the bottom right hand corner to Edit or Delete the selected trap, or to Delete All messages. |
images/SPYDUSGO_EDIT_DEL_TRAP_thumb.png 
|
Stocktake
The SpydusGO Stocktake feature allows to easily perform stocktake from the library floor, without requiring additional hardware (e.g. Bluetooth scanners). The Stocktake feature will behave as though using the Stocktake items option in the Circulation module's Local settings.
To begin Stocktake, first tap the Collection option, and select the Collection that is to undergo stocktake, then tap Next.
| Tap this icon to use the barcode scanner to stocktake items, or manually enter barcodes in the Accession No. field. | |
As in other barcode scanning interfaces, relevant alerts will be displayed where required, or a simple ribbon notification if there are no alerts to be displayed.
Bulk Item Deletion
The Bulk Item Deletion feature offers the same Preferences and a comparably simple UI to the WBA interface.
Preferences
Check if item is the last copyIf this option is selected, and a scanned item is the last copy linked to a bibliographic record, a confirmation prompt will be presented to the user. Check for reservationsIf this option is selected, and a scanned item has a reservation placed against it, a confirmation prompt will be presented to the user. If the user proceeds with item deletion, the reservation will be cancelled. |
images/SPYDUSGO_BULK_DELETE_PREFS_thumb.png 
|
images/SPYDUSGO_BULK_DELETE_LAST_COPY_thumb.png 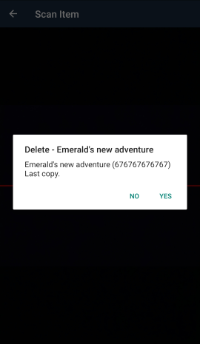
|
images/SPYDUSGO_BULK_DELETE_RSV_thumb.png 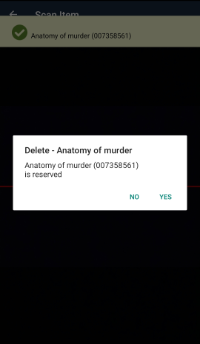
|
| Once the Preferences have been set as required, tap Next, then tap the Scan icon to use the device's camera as a barcode scanner to delete items. Alternatively, item barcodes may be typed direction into the Accession No. field. | |
|
images/SPYDUSGO_BULK_DELETE_LOG_thumb.png 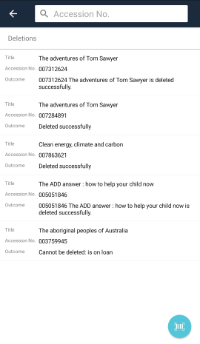
|
The log will display the details of any items that a user has attempted to delete.
Any alerts that prevented deletion of items will be displayed in the log.
|
Events
|
The Events functions in SpydusGO allow app users to review upcoming Events, and to mark attendance.
To review today's event's, swipe from right to left under the Today's events at Location header.
Future events at the logged in location (and at All Locations, by scrolling down) may be reviewed by tapping the related tile.
For non-ticketed Events, marking attendance consists of an incremental numerical 'ticker' to record attendance numbers.
If the Event is ticketed, tickets may be scanned using the device's in-built camera as a barcode scanner. |
images/SPYDUSGO_EVENTS_LANDING_thumb.png 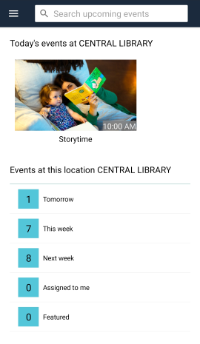
|
To review and modify additional Event details, use the WBA Events module. See Events Online Help for further information.
Marking Attendance
|
To begin taking attendance, tap the Event's tile to view the Event details.
At the Event details page, tap the Take Attendance button.
The subsequent attendance screen will depend on whether the event requires registration.
|
images/SPYDUSGO_EVENTS_EVENT_DETAILS_thumb.png 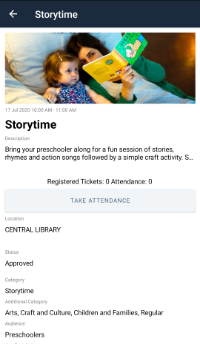
|
Ticketed Events
For ticketed Events, SpydusGO will display a list of Registrations.
There are two options for marking the attendance of a registered person:
|
images/SPYDUSGO_EVENTS_REGISTRATIONS_LIST_thumb.png 
|
1. Tap the Scan icon to access the barcode scanner...
|
images/SPYDUSGO_EVENTS_TICKET_SCAN_thumb.png 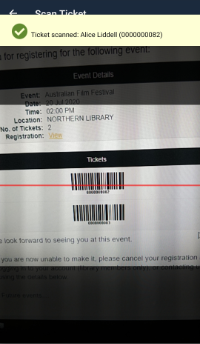
|
2. Tap the attendee's name in the list of registrations.
Tick (or untick) the boxes to indicate the ticket numbers of registered attendees entering the Event.
Tap the back button (either in-app or on phone).
|
images/SPYDUSGO_EVENTS_REGISTRATION_TICKETS_thumb.png 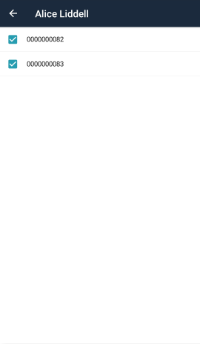
|
Non-ticketed Events
|
For non-ticketed Events, an incremental numerical 'ticker' device will display.
To add patrons to the attendance count, tap the plus (+) icon once for each attendee.
To lower the attendance count (to correct errors, or if a patron leaves), tap the minus (-) icon. The count is only synchronised to Spydus when the Done button is tapped. If taking attendance on multiple devices (e.g. multiple points of entry), make sure to synchronise after updating attendance to allow other devices to maintain an accurate count. |
images/SPYDUSGO_EVENTS_COUNTER_thumb.png 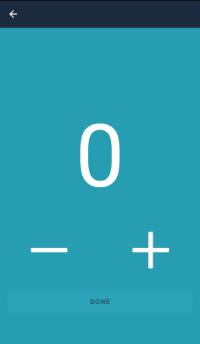
|
In Spydus 10.5.1 and later, it is possible to link non-ticketed Event attendance to a borrower by scanning their library card. Subsequent scans of the same card will increment the attendance count to that registration record.
My Profile
The My Profile page displays the name, username and user group of the logged in user.
Tap the Logout button to log out of SpydusGO.
About
The About page lists:
- the version and build of the SpydusGO app
- the Spydus server version & patch, and the WBA version