To open the Item Status dialog
Here are some different ways to open the item status dialog.
In Enquiry:
- From the Module Menu select Enquiry, Circulation, Item and Item Search.
- Find the record you want, and click Change Item Status at the Full Display.
In Circulation:
- From the Module Menu select Circulation, and type or scan the item barcode in the Quickfind box.
- Click Change Item Status at the Full Display.
OR
- From the Module Menu select Circulation, and return an item.
- Select the item in the Returns grid, and then click Edit Item Status.
OR
- From the Module Menu select Circulation and load a borrower's details.
- Click the Loans link in the transaction summary pane to display the borrower's loans.
- Select the row with the item you want, and then click Edit Item Status.
Set or remove an item status
Available status shows the statuses that can be set against the item. The statuses listed here will depend on those that are already set, for example, you can only set a lost status against an item that’s on loan.
Applied status shows the statuses that are currently set against the item.
To set a status against an item:
- Select one of the available statuses, and click Add.
- You can select a status in the Applied status list to add notes about it.
- Click OK to save your change.
To remove a status from an item:
- Select one of the applied statuses, and click Remove.
- Click OK to save your change.
You can also change the item's status in item maintenance.
The item statuses that you can set or remove depends on which statuses have already been set against the item. This is defined in the item status relationships.
You can see the status history on the Full Display of the item.
Set a damaged status
Some item statuses have additional system functionality or workflows which are invoked when the status is applied. The damaged status is one of these. Let's see how it works.
To set a damaged status against an item:
- Select the damaged status in the Available status list, and click Add. Depending on how the item status parameters are set, you may see an alert, for example:
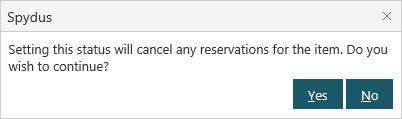
- Click Yes to continue.
- Enter as much information as required or relevant.
- Select the Damage type from the drop down list, and enter free text describing the damage in the Remarks field.
- Specify the Borrower to charge. This can be the current, last or previous borrower, or no borrower.
- Amend the Replacement charge if you wish. You can amend the Charge field (i.e. exclusive of tax) or the Total field (i.e. inclusive of tax).
- Amend the Processing charge if you wish. You can amend the Charge field (i.e. exclusive of tax) or the Total field (i.e. inclusive of tax).
- Click OK.
The replacement charge amount is the retail price of the item or the acquired price of the item or the average price set in the collection parameters.
The processing charge is set in the borrower category or, if there is no charge specified in the borrower category, in the collection parameters.
You can specify whether or not tax is applied to the replacement charge and/or processing charge by setting Apply tax to Yes or No.
Setting a damaged status against an item also sets a trap of "D - Damaged library material" against the borrower. You'll be prompted whether to remove this trap when the replacement charge is paid or waived.
Set a claims returned status
The Claims Returned status can be set on an onloan item to give library staff time to search for it.
- From the Module Menu select Circulation and load a borrower's details.
- Click the Loans or Overdues link in the transaction summary pane to display the borrower's loans.
- Select the row with the item you want and click Edit Item Status.
- Select the claims returned status in the Available status list, and click Add.
- Click OK to save the change. The item is removed from the list of borrower’s current/overdue loans and added to the list of their items claims returned/never borrowed.
Remove a claims returned status
Now we'll assume some time has passed and the item has been found.
- From the Module Menu select Circulation and load a borrower's details.
- Click the Claims Returned/Never Borrowed link in the transaction summary pane.
- Select the row with the item you want and click Edit Item Status.
- Select the claims returned status in the Applied status list, and click Remove.
- Select a Removal status.
- If you choose "Found by borrower" or "Found by library", the Removal action will default to "Item found – automatic return". You can change the action if you wish.
- If you choose "Resolved" or "Write off", the Removal action will default to "Delete item". You can change the action if you wish.
- If you choose "Charge for replacement", the Removal action is set to "Change loan status to lost". You cannot change this action.
- Select Recalculate overdue fines to recalculate the fines up to the current date. For example, the overdue fine may have been frozen when the status was set to claims returned. See Freeze fines when item status set.
- Select Send claim return resolution letter if you want to send a notice to the borrower. Typically you might do this if the Removal status is "Found by library" or "Write off".
- Click OK.
- If the Removal status is "Charge for replacement" then details of the replacement charge and processing charge will be displayed. You can change the charges if you wish, then click OK.
- Click OK to close the Item Status dialog.
If you choose “Item found – automatic return” as the Removal action then the item will be shown under the Previous Loans link in the transaction summary pane.
If you choose “Change loan status to lost” as the Removal action then the item will be shown under the Lost link in the transaction summary pane.
Set a lost status
Lost item processing typically has one or two stages, depending on library policy.
- In 2-stage processing you'd first set the status to reported lost. This gives the borrower time to search for the item. Later, when the borrower has confirmed that the item is indeed lost, you'd set the status to lost.
- In 1-stage processing you'd simply set the status to lost.
In the following example we're use 2-stage processing. First we'll selecting an item from the display of a borrower’s overdue loans and set the status to reported lost.
- From the Module Menu select Circulation and load a borrower's details.
- Click the Overdues link in the transaction summary pane to display the borrower's overdue loans.
- Select the row with the item you want and click Edit Item Status.
- Select the reported lost status in the Available status list, and click Add.
- Click OK to save the change. The item is removed from the list of borrower’s current/overdue loans and added to the list of their items reported lost.
Now, we'll assume some time has passed and the item is indeed lost. So let's set a lost status against it.
- Click the Reported lost link in the transaction summary pane to display the items reported lost by this borrower.
- Select the row with the item you want and click Edit Item Status.
- Select the lost status in the Available status list, and click Add. Depending on how the item status parameters are set, you may see an alert, for example:
- Click Yes to continue.
- You can amend the Replacement charge and Processing charge if you wish. You can amend the Charge field (i.e. exclusive of tax) or the Total field (i.e. inclusive of tax).
- Click OK. The item is removed from the list of items reported lost and added to the list of their items lost.
The replacement charge amount is the retail price of the item or the acquired price of the item or the average price set in the collection parameters.
The processing charge is set in the borrower category or, if there is no charge specified in the borrower category, in the collection parameters.
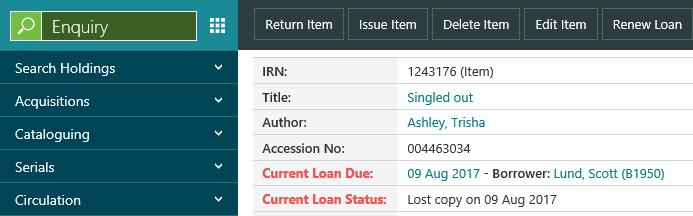
More about lost items
Here's an example of a lost item. In Enquiry you can see that the item is still on loan. The Current Loan Due shows the due date and the borrower, and the Current Loan Status shows the status and the date it was set. There are also links to the associated Charges for this item, e.g. lost item charge, lost item processing charge, overdue charge, rental charge, and so on.

If the item cannot be found, the borrower should pay the appropriate charges and the item can then be deleted from the database using Bulk item deletion or in Item maintenance.
Although we use the term "deleted", the items is really deactivated, with the item record retained in the database but removed from the active view. The loan is still linked to the borrower and to the item. If the borrower later finds the item and it is returned in Circulation, you'll see a prompt like the one below.
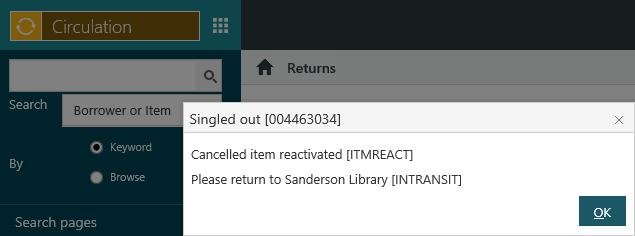
Click Proceed to reactivate the item.