Academic information
These fields might typically be used by schools or colleges to record details of the borrower.
Academic staff
Select this checkbox if the borrower is a member of the academic staff.
Course
If the borrower is a student you can enter their course code here. This is used as a sort key in the borrower statistical reports. Click the dropdown arrow to display a list of valid codes and select one of these.
The academic course are set up in the ZBE lookup table, and can be maintained using the Table Manager.
Faculty/Dept
This field is used in the registration of staff members. When a member places an order, the library may wish to identify which department he or she belongs to — this is often the case in academic libraries. Click on the dropdown arrow to display a list of valid codes and select one of these.
The faculties/departments are set up in the ZBF lookup table, and can be maintained using the Table Manager.
Home group and Year level
These would typically be used by school libraries. Click on the drop down arrow to display a list of valid codes and select one of these.
The home groups are set up in the ZBG lookup table and the year levels in the ZBH lookup table. These can be maintained using the Table Manager.
Intake number
Enter the intake number.
Student status
Click the dropdown arrow to display a list of valid statuses and select one of these.
The student statuses are set up in the ZBV lookup table, and can be maintained using the Table Manager.
Study mode
Click the dropdown arrow to display a list of valid modes and select one of these.
The study modes are set up in the ZBU lookup table, and can be maintained using the Table Manager.
Address
You can specify the borrower’s residential address, mailing address and temporary addresses.
The temporary addresses are used for notices generated between the specified dates. As part of notice generation, Spydus will first check these addresses as follows:
- If there is a temporary mailing address Spydus will use it (if the current date is within the specified period).
- If there isn’t a temporary mailing address then the “permanent” one will be used.
- If there’s no “permanent” mailing address then a temporary residential address will be used (if the current date is within the specified period).
- Finally, if there’s no temporary residential address then the “permanent” one will be used.
Temporary residential addresses are also used for home services delivery rounds run between the specified dates.
If you've loaded a file of postcodes to your database you can use a "postcode search" for the address in borrower registration, i.e. you only need to enter a valid postcode in the Postcode field for the borrower, guarantor or employer to find the address, city/town, etc.
You can set up the ZDF lookup table so that the postcode is auto-populated when you enter the city/town.
The states are set up in the ZDS lookup table and the residential areas in the ZBD lookup table. These can be maintained using the Table Manager.
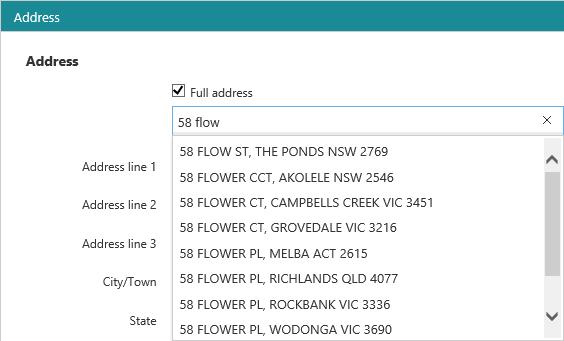
Australian sites can use Addressify (a cloud-based web API) to validate borrower addresses. When this is enabled, the Full address checkbox is selected by default in the registration details. Start typing in the full address field and you'll see a list of possible addresses after you type the first seven characters. You can then select the one you want.

The address you type must include the house/apartment number and a partial street name to trigger the search. Addressify doesn't validate PO box addresses. If you type an invalid address you'll see a message prompting you to try again.
For more information about Addressify try the website http://www.addressify.com.au/.
Barcode
Click Barcode to open a dialog box to scan, type or auto-generate the new borrower’s barcode number.
Category
Select the borrower’s category from the dropdown list.
Check loan history
Select this checkbox to prompt the system to check the borrower’s loan history when an item is issued. If the item is found in the borrower’s history, an alert is displayed.
Whether the loan history is checked depends on the setting of Check loan history in the Circulation General Parameters and the borrower category.
Citizenship
This lets you specify the type of citizenship of the borrower.
Disability
Select a disability from the dropdown list.
DOB
You can enter the date of birth by typing it in the DOB box or by clicking the calendar icon  and selecting a date from there. You can click the month to display the months and then select a month to drill down to the days, and you can click the year to display years.
Driver
Select this checkbox if you are registering a driver for a home services delivery round.
Enter the e-mail address for this borrower. You can specify multiple e-mail addresses if you wish. Use a semi-colon to separate the addresses, for example here you have specified three addresses:
asmith@civica.com.au;gjones@civica.com.au;bmann@civica.com.au
Employer details and address
Here you can enter details of the borrower’s employer.
Ethnicity
Select an ethnicity from the dropdown list.
Family relationship
In borrower registration you can “link” a child to the head of the family (for example a parent or grandparent).
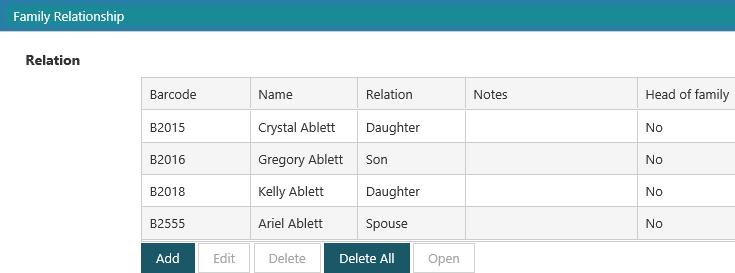
You can also specify the fields that the child will inherit from the head of family’s registration details, for example, surname, residential address, home phone number, etc. You can see an example of this below. Here we’re looking at the head of family’s registration details.

Click Add to add a new relation. To edit or delete details of the relationship, select the row you want and then click Edit or Delete.
To load borrower details for any of the relations, select the row you want and then click Open. You'll be prompted to save any changes in the current borrower.
The Fields inherited by dependants shows all the fields that can be inherited by dependants, i.e. by borrowers who have THIS borrower as their head of family. By default all the possible fields are selected, but you can clear any you don’t want to be inherited. Once a field is inherited, it cannot be changed in the dependant record. Changes made to the head of family record will be automatically made in the dependant record too.
Linking to a head of family
First register the head of family, and select the fields to be inherited. Now register the dependant borrower:
- Click Add to add a new relation.
- Search for the head of family, and select the record.
- Select the relation, and add any relevant notes.
- Select the Head of family option.
- Click OK.
- Click Save or Save & Close to save your changes.
The Head of family option is only enabled if the borrower is below the age to delink head of family from borrower's account.
Breaking the link between a dependent and head of family
To break the link:
- Open the dependant’s registration details.
- Select the row you want in the relations.
- Click Delete, and then click OK at the confirmation prompt.
- Click Save or Save & Close to save your changes.
Gender
Select the borrower’s gender from the dropdown list.
Global and local notes
Here you can enter any general notes regarding the borrower that will be shown in Enquiry. Global notes are carried across institutions if the borrower is registered in more than one institution. For example, local notes entered at Institution A will only be relevant for that particular institution and cannot be seen through Enquiry at Institution B. But any global notes entered at Institution A will be shown at Institution B
Guarantor details and address
Here you can enter details of the borrower's guarantor.
If you want circulation notices to be sent to the guarantor rather than the borrower then you can set Mail address to use to "Guarantor's address" and/or Email to to "Guarantor’s email address" and/or Phone to use to "Guarantor home/work phone number". You also need to set Send notices to guarantor in the borrower category.
Home phone, work phone and mobile
Enter the borrower’s home, work, and mobile phone numbers. Only one number can be recorded per field.
Image URL
Borrower images can be stored on the server and displayed in Circulation when a borrower is loaded. Use this field to add the path to where the borrower image is stored.
A thumbnail version of the borrower image must be stored in the same folder, following the convention of appending a 't' to the filename. e.g. where the Borrower image URL is:
- /images/A987654321D.jpeg
...the thumbnail must be located in the same images folder, with the filename:
- A987654321Dt.jpeg
Institution name, contact name, designation, web address
Here you can specify the name of the institution, the contact’s name and designation, and the web address.
Spydus will automatically supply the Internet protocol so do not include it in the web address, for example, enter www.civica.vic.edu.au rather than http://www.civica.vic.edu.au.
Interests
Select the borrower's interests. The values for this field are set up in the BNT lookup table, and can be maintained using the Table Manager.
Languages
Select the languages spoken by the borrower. To add a language, click in the box to list the languages, and select the one you want. To delete a language, click in the box and hit the backspace key.
The languages spoken by borrowers are set up in the ZBR lookup table, and can be maintained using the Table Manager.
Lender information
Lender
For a borrower who lends items to the library, for example, an interlibrary loan lender, select the Lender checkbox.
Dispatch method
Specifies how an inter-library loan request is typically dispatched to this lender.
Charge photocopy, and charge loans
Not currently used.
Days to return
The best way to explain this is with an example.
Let's say the date is 23/2/17 and the lender has Days to return set to 7 in the registration details.
We receive an ILL item from this lender and set the date due to 6/3/17. Then we issue the item to a borrower.
Let's say the loan period (in the loan policy) is 21 days. If we used THAT as the loan period then the item would be due back AFTER 6/3/17. An alert is displayed when we try to issue the item, with a checkbox Set due date to 27/2/17 — i.e. 7 days BEFORE 6/3/17. Click Proceed and the due date for the loan is set to 27/2/17.
Specialisation
Specifies any particular areas that the lender specialises in.
You can display the institutions in particular areas of specialisation using the Specialisation option in a borrower enquiry. This would be used to find the most likely lending institution when entering a request.
Lender ID
This feature requires server version 10.9 or higher.
The Lender ID can be used to search for Institutional Lenders to link to Request records. The Lender ID would usually be expected to match the format of the NUC (e.g. AU.VXYZ). The Lender ID field has been added to the Borrower Search form.
Location
Select the borrower’s home location from the dropdown list. The location used to login to Circulation will be populated as the home location and can be modified if appropriate.
Member category, number, status and membership date
If the borrower is a member of a society/club, you can enter details here.
Name, additional names and DOB
If you are creating a new borrower and are not sure if this borrower has previously been registered, you can Search for the name in the Action menu. Select the borrower that you want, load their details and edit the registration. If you don't find the borrower then you can register a new one.
Surname first specifies how the borrower heading is built, i.e. it controls whether or not to insert a comma between the two parts of the name.
- If Surname first is not selected then the heading is “surname, given names”, for example Smith, John.
- If Surname first is selected then the heading is “surname given names” (with no comma between the two), for example Lau Yu Seong.
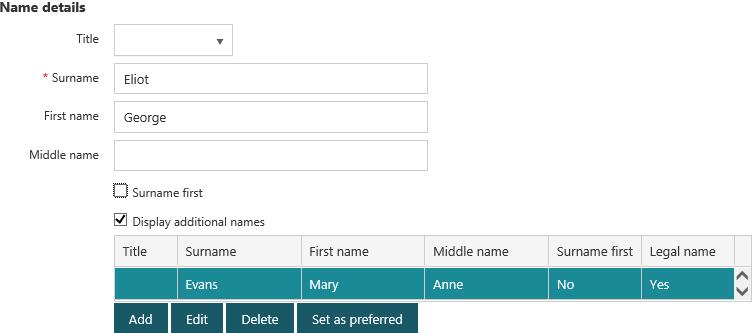
Select Display additional names to view, edit or delete details of any additional names for the borrower, for example:

If the borrower has no additional names, then the Surname, First name and Middle name will be the legal name. If the borrower has additional names, you can specify one of these as the legal name.
If you select an additional name and click Set as preferred, this name becomes the Surname, First name and Middle name, and the current Surname, First name and Middle name is now an additional name.
You can specify whether Surname first is selected by default on the user interface setup tab in the borrower registration parameters.
The borrower titles are set up in the ZBK lookup table, and can be maintained using the Table Manager.
Notices and slips
Send notices to head of family
If the borrower is linked to a parent then Send notices to head of family will be available. Select this checkbox if you want notices to go to the head of family rather than the selected borrower. If Send notices to head of family is selected then the other boxes in the Notice delivery group will be unavailable.
Mail address to use
This specifies the mailing address to use for printed notices. If the Employer and/or Guarantor tab is displayed, then "Employer’s address" and/or "Guarantor’s address" will appear as options as well as "Borrower’s address".
SMS
This specifies whether circulation notices for this borrower are to transmitted by SMS.
- No - notices will not be transmitted by SMS.
- Yes - notices will be transmitted by SMS.
- Yes and E-mail/Mail Notices - notices will be transmitted by SMS and by e‑mail/mail, i.e. one notice will be transmitted by both SMS and e‑mail/mail.
Phone and Phone to use
This specifies whether circulation notices for this borrower are to be transmitted by telephone, and which number to use.
- No - notices will not be transmitted by telephone (but see Notes below).
- Yes - notices will be transmitted by telephone.
- Yes and E-mail/Mail - notices will be transmitted by telephone and by e‑mail/mail, i.e. one notice will be transmitted by both telephone and e‑mail/mail.
To be able to deliver notices via telephone for a particular borrower, Use telephone interface for notices must be set to Yes or All in the borrower category.
If Use telephone interface for notices is set to All in the borrower category, notices will be sent by telephone even if Phone is set to No in the registration details — provided the borrower has a telephone number.
Send email and Email to
Select Send email if circulation notices for this borrower are to be transmitted by e-mail, and specify which address you to use in Email to.
If the Employer and/or Guarantor tab is displayed, then "Employer’s address" and/or "Guarantor’s address" will appear as options as well as "Borrower’s address".
If Send email is selected then you must specify the address specified in E-mail to, i.e. the borrower’s address, employer’s address or guarantor’s address.
Slip printing
This parameter applies to issue, renewal and onloan slips, and controls whether these slips are to be printed, emailed and/or sent by SMS. Borrowers can also choose NOT to receive any slips as well. Staff can use the dropdown list to select the borrower’s preference of receiving their slips.
Loan reminder period
Select a period here and Spydus uses this rather than the notice policy to determine when to send loan reminders to the borrower.
The loan reminder period is only used if the borrower is receiving notices via email or SMS.
The loan reminder periods are set up in the LRP lookup table, and can be maintained using the Table Manager.
Preferred language
If you've translated your notices into different languages then you can choose one of those languages here.
The preferred languages for notices are set up in the NTCL lookup table, and can be maintained using the Table Manager.
Password and confirm password
Since personal passwords are not meant to be made public, we "hide" the contents of the Password and Confirm password fields. You'll see a series of dots rather than the actual password when you edit a borrower's registration details.
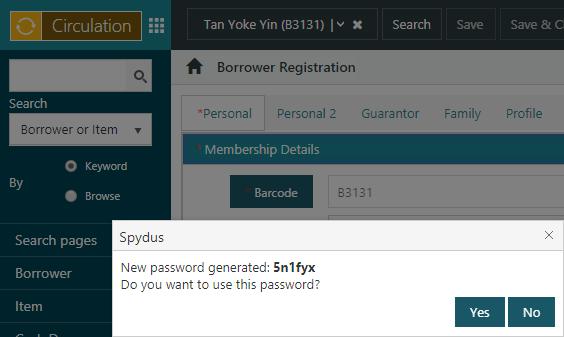
You'll see the Generate Password option on the Action Menu:
- If Use password rules is selected in the borrower password rules.
- If your user privilege level (in the User group) is equal to or greater than that specified for the Password and Confirm password fields in the borrower registration parameters.
Click this option and you'll see the new password. Note the password and pass it to the borrower.

Post delivery
If this is selected, then when reservations are made for this borrower, staff or the borrower via Staff Enquiry or OPAC, can opt to have their reserved items delivered by post.
Privilege codes
This is used with loan policy. If you specify a borrower privilege level in the loan policy, then the borrower must have that same level specified in their registration details to be able to borrow items under that policy. Click in the box to display a list of valid privilege levels and select one of these.
Profiles
A current awareness profile is used to find items that the borrower is interested in, for example, you might create a profile to search for items by a particular author, subject or publisher.
Profiles can be scanned as part of the library’s overnight housekeeping. Any new works that meet the profile’s search criteria are added to the “profile set”, and the borrower is notified by e-mail. The e-mail includes a hyperlink to each work. The borrower can then click on the hyperlink to go directly to the work and place a reservation against it if they wish.
Profiles can also be used to select items for Home Services.
Click New profile to add a new profile. To edit an existing profile, select the profile to edit and click Edit profile.
Profile notes, Preference notes, Exclusion notes and Security notes
Record any notes in these free-text fields relating to a Home Services borrower. For example, record the borrower’s likes and dislikes, and any special security messages regarding access to the house.
Date cancelled
Not currently used.
Cancelled from and Cancelled to
Specify a period when the borrower does not want to be included in a delivery round. If you specify these dates and try to allocate items to the borrower using profile matching then you'll see an alert.
No. of works
This specifies the number of items the borrower would like to receive in each delivery. You'll see this number when you're profile matching.
You can still use profile matching for a borrower even if No. of works is not specified, however it's best if it IS specified so you can tell how many items they would like to receive.
Cancel notes
Record any notes in this free-text fields relating to the cancellation.
Receive marketing
Select this flag to indicate to staff this borrower has consented to receive marketing/advertising materials from the library. You can see the date/time this flag was set or removed and by whom on the full display of the borrower in Enquiry.
Registration date
This is automatically set to the current date when you first register the borrower.
Registration expiry
The default expiry date is calculated automatically from the Registration period, Registration start date and Registration expiry date in the borrower category. If you wish you can click on the drop down arrow to display a calendar and select a date from there.
Secondary ID
You can use this free-text field to record a secondary form of ID such as a driver’s license number or student ID.
Share data
Select this option if you want a borrower registered in the current institution to be automatically registered in other institutions — i.e. when you scan the borrower’s barcode through Circulation in another institution or when the borrower chooses a pickup location in another institution.
If the borrower belongs to another institution and Share data is NOT selected then you will show “BLOCKED” rather than the borrower’s name and barcode in Staff Enquiry.
If Share data IS selected, staff will be prompted that the borrower has not been registered with the institution and the borrower’s home category will be displayed.
Site-specific information
You can maintain borrower details that are specific to your site.
|
Please contact Civica Support for assistance as commissioning is required. |
Status
Select a borrower’s status from the dropdown list. For example, you may set a status code against new borrowers or borrowers who have resigned.
Username
You can specify a username in the registration details for borrowers to use to login to the OPAC instead of a barcode number.